Tuesday, December 12, 2017

HillBilly Mojo Catering

If you have an event or just want dinner for a family gathering HillBilly Mojo will make it special.


HillBilly Mojo will bring the ranch life to you & your guests with a culinary adventure that brings a sense of rustic elegance with a fusion of Tex-Mex & Texas Barbecue.

Our style features a rich, smoky flavor pallet with south of the border influences.  You'll experience delightfully sassy lime, chill pepper, and Tex-Mex notes peeking through the robust smoky Texas bbq foundation.  Custom menus available.  


Fresh vegetables grilled to perfection


Saturday, August 12, 2017

The Perfect Smoked Turkey Breast EVERY TIME!


By Steve Smith

Turkey breast is great for you and taste great AND it's not nearly the undertaking that a brisket or a pork butt is.  You only need a few hours and you can have a moist, succulent smoked turkey breast.

Buy a bone in turkey breast.  I recommend the biggest one you can find.  Debone carefully and prepare a brine in which the breast will soak.

I use apple juice, apple cider vinegar, Worcestershire, lime juice, kosher salt, hillbilly mojo black and some water.  Mix up good and let soak over night or as long as possible.

After the brine, place in a shallow pan.  Cover generously with HillBilly Mojo BLACK, RED or SWAMP and set on the pit at around 250 to 325.  Let it stay on the pit for about 30 minutes to an hour.  Just enough to get that bark started.

Remove from pit.  Place on aluminum foil.  Cut butter pads from a stick of butter.  Use about 1/2 to a full stick.  Place the pads of butter on, in and under the breast.  Wrap up in foil and place back in pan.  Insert a meat probe and put back on the pit.

Cook until it arrives at an internal temp of  165 F.  Snatch it out of the pit, let it rest for about 20 to 30 minutes.  Slice thinly and let it melt in your mouth!

To buy HillBilly Mojo Smoked Sea Salt or Seasoning rubs visit OUR WEB SITE or see our Facebook Shop.


 Hickory Smoked Sea Salt 


Wednesday, May 17, 2017

Deer Back Strap- Easy, Quick and Taste Great!


Venison back strap is revered as the best part of the deer by many, and I count myself in that crowd.  

It takes some work to properly prepare a strap for cooking, but once all of the silver is removed and the other trimmings are done as needed it is a delectable cut.  

I like to not only remove the white/silver layer along one side of the strap, but also remove a thin layer of meat/membrane from all of the other surface area of the back strap.  I find that this removes any trace of gamey flavor.

After properly trimming the cut of venison we applied a good layer of HillBilly Mojo Black Label rub and then cut the strap into 3 pieces.  We then seared all sides in a cast iron skillet, applied the magic formula, a few pinches of HillBilly Mojo Hickory Smoked Sea Salt!  This stuff, along with the HBMJ BLACK makes ALL the difference in the world.  Your can taste the smokey rich flavor and when it's coupled with the large gains of dark smoked sea salt it ads a wonderful texture and culinary experience.

We also add some fresh rosemary, wrap loosely in aluminum foil, place on fire at 475 for 18 minutes and as soon it hits 130 degrees, take it out.

Visit our Facebook store to get some of our smoked salt or HilBilly Mojo spices.

It's fast and easy tastes like it costs $50!  More work goes into trimming the strap than anything else!

Steve Smith
Stay wild and free

Monday, April 3, 2017

HillBilly Mojo Shares the SMOKE!

HillBilly Mojo Unveils BLACK & RED.

SMOKE . . . makes everything taste better.  We've been making great rubs, spice blends, sauces, jerky and other great provisions for decades.  Now we have decided to share our flavor with our friends!  Smoke is the basis of all of our flavors.  We actually smoke our spices and minerals to enhance them with that wonderful, smoldering mesquite flavor.  

For starters we are offering 2 basic rubs with a third on the way.

HillBilly Mojo Black- A gruff, coarse ground blend of smoked salt and other spices that create a thick, beautiful textured bark on your brisket, pork butt, ribs etc.  It's rich in black pepper and plenty of smokey flavor.

HillBilly Mojo Red- A robust, zesty, full flavored rub with a finer grade.  Red highlights various chili flavors along with . . . you guessed it, smoke.  Red is just the right level of spiciness, bringing on just a hint of heat that most carnivores can enjoy.  It's GREAT on pork, chicken and fajitas!

Up Next:  HillBilly Mojo Red Double Diamond Back! Double Diamond will have the same basic characteristics of the RED but will bring on the heat for those of us who like it spicy.  

Other delights on the way include 2 blends of BBQ sauce.  HillBilly Mojo "Country Twang" and HillBilly Mojo "Sweet and Smooth".  We'll also be releasing a few lines of jerky in the future.   Stay Wild and Free!

If you would like to get some of the HillBilly Mojo RED, BLACK or Double Diamond please send and email to steveshots42@gmail.com.


#staywildandfree
#bbqsauce
#bbqrub
#hillbillymojo


Saturday, February 18, 2017

The Browning X-Bolt- Review

The Browning X-Bolt rifle is one of the gun maker's newer offerings. I took a brand new specimen out to the ranch this past weekend for a trial run with the intention of reporting my experiences to you should you be in the market to purchase a new rifle. Of course, I do not work for any gun maker nor do I have any deal with any company. I traded a Savage 116 in 7mm mag for this Browning in .270 and will be using it as my "across the canyon" long distance provider in the 2017-2018 deer season in Edwards County, Texas.

 My first impression was "Wow! It's purdy!" It has beautiful sleek lines and curves. The stock is ergonomically designed making it very comfortable to handle. The action is buttery smooth and the gold plated trigger is a nice touch in presentation. 

Mounting a scope on the Browning is a little more involved that that of a Savage, which is too easy. On the Browning, unless you use the base/ring set BY Browning, it will take a little finesse and patience. I bought Leupold bases and rings. It took some doing to get the rings on the bases lined up so they would receive the scope properly. I believe that the Browning all in on piece rings/base set is about $50 - $60 and you can't get it wrong. The Leupold bases and rings cost me about $50 from Academy. If I had it to do all over again, I would make sure of exactly which Browning ring/base set my gun needed and order from Amazon.  With the Browning set it 8 screws and off the the range.

 For my test I used cheap no name ammo. I found that the rifle shot sub MOA groups effortlessly. The trigger is very pleasant and crisp and the luxurious butt/recoil dampening pad has a jell like substance inside that made shooting the X-Bolt very nice. 

I am very pleased with my new rifle and highly recommend the X-Bolt to anyone who is looking for a high quality rifle that doesn't have a Tupperware stock but is by no means a safe queen that you are afraid to put in the field.

-Steve Smith- 
HillBilly Mojo 
Stay Wild & Free
The X-Bolt uses a detachable magazine

Monday, January 30, 2017

Never Let the FACTS Get In the Way Of a Good Hissy Fit!

I am not going to turn HBM into a political site.  This is likely the last I'll say on the subject.
Ever noticed that throughout all the protests and demonstrations, be they peaceful or violent with vandalism of property and assaults carried out against those who have a different opinion, the protesters can seldom articulate exactly what it is they want to change other than vague generalities of Never Trump.  So many times on various news casts the live reporter would ask a post election protester why they are protesting.  Because we stand against Trump!  What exactly about Trump?  He ran his whole campaign based on (stand by for the regurgitation of buzz words) bigotry, racism and xenophobia etc..  Can you give me an example?  uh, just his whole campaign was run based on these things.

This seems to hold true for most of the responses from any given protest.  It seems as if most are simply following someone else's ideals and protesting just because.  Has Trump ever made poor choices regarding how he words things?  Oh yes!  He has been guilty of saying things in a way that offends people.  Now, that said, most of the big moments of offense have been more "Gotcha" opportunities for people who truly want to be offended.  Before you throw his unsavory comment about grabbing them by the P. . . in my face, yes, we all know that was terrible and it was one situation.  As distasteful as that comment was it still doesn't make him a racist or most of the other labels stamped on him by those so disappointed that Hilary lost.  Funny how her flaws we so much more palatable than Trumps.

Now Trump has done exactly as he said he would do and has taken actions that are intended to help keep Americans safe by restricting our borders in an effort to thwart terrorism. He imposed a TEMPORARY BAN on immigration from certain countries known to spawn terror attacks.  It is not a ban on Muslims, but a pause to give an opportunity to revisit our current policies and make needed adjustments in the process in an effort to keep Americans safe.  But the facts aren't sexy.  It's much more fun to say it's racist, and anti-Muslim and protest just because.  NEVER LET THE FACTS GET IN THE WAY OF A GOOD HISSY FIT!

The women's march is another example of blindly following the leader in a giant vagina hat spouting obscenities.  There have been no women's rights infringed upon, but they seem to be protesting to show unity and resistance of what MIGHT come to pass.  Okay ladies, duly noted, but please realize that you actually don't need to be vulgar to get your point across.  Let's not even waste strokes of the keyboard examining the Hollywood theatrics used by a few fading starlets as they have little to no relevance.

PLEASE GET THIS:  Though I have obviously laced this article with both sarcasm and my own personal opinions, which whether or not you agree with me is my right, my point is that much of the protesting and attention hounding is based in emotion and not facts.  I love that we CAN protest what we don't like.  I love that we take advantage of that freedom and if I find myself in a situation where I have to defend someones right to peacefully protest (regardless of my own opinion) I will defend them.  I believe that those of us who wanted a complete  change in direction for our nation do not wish to violate anyone else's pursuit of happiness.  We simply want common sense and we don't want the lifestyles of others shoved down our throats.  We're sick and tired of political correctness and want to call things what they are.  Most of us are just fine with gay marriage, freedom of religion, we don't hate Muslims (but we do want them to help defeat terrorism by standing up against it) some of us may not believe that abortion is right, but we all understand that it is the law of the land.  We have far more important issues to tackle than spending energy standing in the way of these things.  I don't think that Trump sees these things as issues or rights that need to be taken away either.  He has plenty on his hands, like not saying anything stupid, fighting ISIS, getting our country back on track financially, fixing the foolish waste of money by Washington and so much more.

For starters, PLEASE STOP THE HATE SPEECH AND PROTEST.  The left is so filled with hate and violence, so much more than those they accuse of the same.  Please behave with grace and dignity like Americans should.  Trump IS THE PRESIDENT OF THE USA . . . PERIOD. When Obama became POTUS the right didn't like it one bit.  However we said "let's give him a shot."  In our eyes he blew it. In your eyes he did great.  We disagree.  But the actions of some of those on the left have been absolutely disgusting, shameful and, well, deplorable.  But I know that's not who Americans are.  We are better than that.  We overcome, we unite, we move forward, we vote.


If you are unsettled by the results of the election, I understand.  I truly hope that you find comfort and peace as we see what unfolds.  I personally don't think it's going to be as bad as some fear.  Just like when Obama was elected he never came looking for our guns.  Give peace a chance, or for the love of God, at least give dignity a shot.  God bless you, Merry Christmas, I pledge allegiance to the flag, I love to eat meat . . . AND stay wild and free!
-Steve Smith HillBilly Mojo-

Tuesday, January 24, 2017

Off Grid Cabin Solar Power Made Simple and Cheap


A small, affordable solar power system is a great way to improve your off-grid deer camp experience.  This article is not for the expert, it's for the beginner with little to no knowledge of the subject.

I am not an electrician.  In fact, I have pretty much zero experience in electrical work other than when we designed and installed a solar power system for the camp house at the ranch.  Before the cabin was finished I began researching the subject online and I must say, after reading many articles and watching many YouTube videos I thought my head was going to explode!  Through the process, I have managed to simplify it down to a manageable concept and cut through much of the technical clutter.  Please note that I am not an electrician and far from an expert on the subject.  You should take safety measures and seek the advice of professionals to avoid danger.  The electricity at the camp house has been intact for about 3 years now and we haven't had any mishaps and it has worked very well.   As far as safety, danger, and liability is concerned you have been warned that I am no expert so you are indeed on your own; that said, this has worked well for me.  I recommend that you do a lot of research on the subject, ask other people who know about electrical and be very careful.

The Basic Concept
I found it easier to think of the solar electrical system like a horse trough with a water hose going into it.  The trough is the battery, the water is the electricity, the horse drinking the water is the load or what you are using the electricity for, and the garden hose is the power coming into the battery from the sun and solar panel. You want to keep the hose turned on just enough to keep the trough water level fairly constant while the horses are drinking, and to stop flowing when the trough is full.

The goal is to find the right mix of batteries, solar panels, and power consumption to keep the battery almost full at all times.  Draining the batteries down and recharging them over and over again diminishes the life of the batteries.
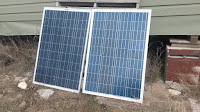
2  100W Solar Panels 

Be Realistic
When I was dreaming up our power system I imagined running a small window unit, coffee maker, small refrigerator,  lights and several wall plugs.  We've had the ranch since 2005 and never had power and really never missed it.  We seldom used the generator for that matter.  We used Coleman lanterns for light.  The only power we REALLY need is lights, wall plugs for phone chargers and maybe a small fan.

We planned to have a light in the middle of the main living area, a light over the kitchen prep area and a light above the table where we eat.  We have since added a bedroom with a light and two wall plugs as well as a back porch with a light and two wall plugs.  On the back porch we put one plug down low near the doorway and one up high and in a corner so that it could be used for string lights.

The Basic Components To Get Started
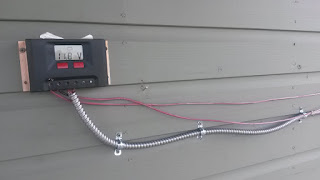
30A Charge Controller
There are many directions you can go but here are my recommendations based on my experience.  Amazon proved to be the best resource for procuring supplies. The $10 Prime membership will save you a bundle on shipping.  I highly recommend that you NOT shop Harbor Freight for SOLAR COMPONENTS.  


Wire coming in from the solar panels to the
charge controller on the wall and then to the batteries. 


COMPONENTS:
1 or more 100W solar panel  ($120-$150)                1 750W or greater power inverter ($50-$125)
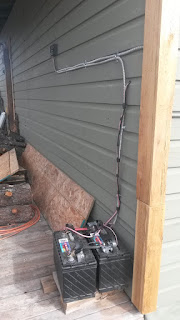
1 (or more) deep cycle battery ($100)
1 30 amp charge controller ($35)
Heavy gauge wire from the solar panel to the charge controller and from the charge controller to the battery

Wiring the cabin
To wire the structure, do so as you would any house for the light fixtures, wall plugs, switches, etc.. If you want the safety and status of including breakers and what not, do so.  It will increase the cost by a little.  If you are like me and not so savvy about residential electrical then try thinking of your lights and outlets as a big set of Christmas lights (or an extension cord) with outlets and switches in the line and put a regular male wall plug at the end of the line to plug into the inverter receptacle to energize the run.  I turn off the inverter when I leave which turns off the power to the system.  I created 2 circuits and put wall plugs on the ends and plugged them into the 2 available plugs on the inverter as if the wiring, light fixtures and wall outlets were just a big, home made extension cord or a set of Christmas lights.
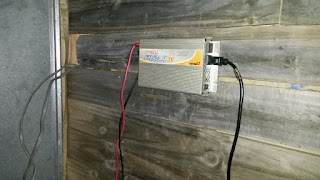
Power inverter-Inside of the cabin- Black plug is connected to the wiring of the house
that has the lights and wall outlets.  The red/black lines go through the wall
and outside and are connected directly to the batteries.

Setting up the system
Once all your wire has been pulled and you have planned out where your light fixtures, power outlets, and switches will go, install your power inverter in a place that makes sense, keeping in mind that you will be connecting the wiring circuits to the inverter.  On the other side of the inverter, there will be the posts, to which you connect the wires, that go to the 12V batteries.  The way I did mine is I put the inverter on the inside of the cabin and drilled a hole in the wall leading to the outside.  I ran the large gauge cable from the inverter, through the hole to the outside, down the wall and connected to my 12V batteries.  I then mounted the charge controller to the outside of the cabin (see photos) and ran wiring from the charge controller to the batteries and then ran wires from the charge controller to the solar panels.  The charge controller has wire receptacles for the solar panels and for the batteries.

So, the sun hits the panels sending a trickle charge into the charge controller, the charge controller evaluates how charged up the batteries are and shuts off the charging of the batteries once they are full to prevent damaging them.  From the charge controller, the power goes into the batteries (until they are full).  The batteries are connected to the inverter and the lights and outlets are plugged into the other side of the inverter.  Of course, the inverter changes the electricity from the batteries into regular household power.  It's a bit unconventional but simple (once you get your head around it) and as long as you are very careful and keep it turned off when not in use it seems to be pretty effective and safe.  I have had no problems in the last 3 years of semi-regular use.

Recap/summary:
Solar panels (facing south)- wires from the solar panels going to the charge controller.

Another set (pos./neg) of the same kind of wire goes from the charge controller (little black box mounted on the outside wall) to the batteries.

Larger wires (pos/neg) go from the batteries (which are being charged by the solar panels and monitored by the charge controller) up the wall and into the hole to the inside of the cabin and are connected to the positive and negative posts on one side of the power inverter.

The house wiring has a regular male household plug on the end which is plugged into the inverter, which energizes the line giving power to the outlets and light fixtures.  Light switches are placed before the lights so they can be turned on and off as per your needs.

Clear as mud!  Right?  If you want further clarification send an email to steveshots42@gmail.com and we can even set up a phone call to discuss it.

Steve Smith
HillBilly Mojo

Wednesday, January 18, 2017

Creating a Water Hole For Wildlife or Livestock- Storing Away Water For a Sunny Day.


If you don't have a creek, river, pond, lake or other dependable water source where you want it for your wildlife and/or livestock you can store away water for a sunny day!  The concept is often referred to as a rain guzzlers in arid regions.  It's a pretty simple concept.  Use a large holding tank to hold enough water to, hopefully, last through dry spells in between rains.  We built a small/mid sized guzzler with angle iron, tin roofing, guttering and a big water tote.


Using the angle iron we welded a frame big enough for the holding tank to fit on the inside and gave the roof a gradual slope.  We put metal roofing on top and installed a rain gutter on the low side to channel the rain water onto the holding tank.   The dimensions are roughly 5 1/2 feet high about 6 feet long and about 4 feet wide.

We set the structure on a high point and set a water trough slightly downhill from the tank and roofed frame.

Using various fittings and PVC pipe we piped down to the trough.  We installed a float valve (available at Tractor Supply Company) on the trough to stop the flow of water from the tank when the trough is full.

We put about 100 gallons into the 300 gallon holding tank as a starter supply and let the rain do the rest.  It's been about 6 months of both wet and dry and we still have plenty of water.  For the most part, it's self sustainable and requires little to no maintenance.  It has made a difference in wildlife traffic in this area of the ranch.

You can build your own guzzler bigger, smaller or however you feel serves your needs.  I will say that when I make my next one, I will be making the roof bigger than we did on this one.  In fact, I would advise you to make the roof as large as you can.

I hope this inspires you to do your own.  If so, please share photos and information with us!  Please leave your comments and subscribe to our blog.


-Steve Smith-

Note on the float valve,  These are available in various styles at Tractor Supply company priced between $19.00 and about $27.00.  They all attach about the same way and function the same.  They will receive a garden hose or the same size PVC fitting for more durable plumbing.

Monday, January 16, 2017

Kill & Eat! Venison Slow Roast- A Wild Game Meal of Perfection!

 There's something primal and clean about harvesting the bounty of the land and creating a meal out of it.  It's all natural, organic and wholesome. We all know that the back strap of the deer is favored above most other parts, but there is some good eating in separating out those muscles in the hind legs for cooking roasts.  I'm sure there are countless ways of preparing your deer for the table, but here is what we did.  I hope you enjoy this and I would love to hear your thoughts and ideas on the subject in the comment box provided below.

The Meat- We cut along the muscle lines on a hind leg creating a nice roast.  We cleaned away all silver and even the extremely thin sub membrane that covers the flesh.  I recommend doing this with a filet knife so the absolute minimum amount of meat is wasted.  I have found that trimming away the sub membrane renders a beautiful bright and vibrant meat as well as greatly reduces the often gamey flavor associated with some wild game fare.

The Prep

Once trimmed and cleaned we placed the roast in a bowl with about 3/4 cup of Worcestershire, a dash of soy, 1/2 of a lime squeezed into the bowl, a few cloves of garlic and some of my own and very special HillBilly Mojo Venison Rub.  Cover the bowl with Saran wrap and place in the fridge for a couple of hours to marinate.  We left ours in over night.


 LEFT:  HillBilly Mojo Venison Rub has hints of Italian herbs with an edgy southwestern 
robust flavor mix.  It's perfect for venison and other lean meats.  


Next we applied a healthy layer of HillBilly Mojo Venison Rub,
heated a cast iron skillet, threw in some garlic and butter and seared all sides of the meat to lock in flavor and create a wonderful texture.  Once the roast was good and seared we placed it into the crock pot with onions, red bell peppers, small potatoes, garlic, carrots, red wine, the marinade, a can of cream of mushroom and water.  We set the crock pot for low and slow at 10 hours.  

The final result was a tender, juicy roast that fell apart at the fork.  The natural gravy was absolutely perfect!  The addition of dinner rolls to sop up all that beautiful gravy rounded out this wild game meal perfectly!  

PLEASE SUBSCRIBE, COMMENT AND SHARE.

Friday, January 13, 2017

Dutch Oven- The Limitless Possibilities Of Open Fire Cooking

By Steve Smith

There are few things as relaxing and pleasing to the soul as a campfire.  A great activity to add to your campfire experience is dutch oven cooking.  You can enjoy dutch oven cooking outdoors at a campsite, but you can also do so at home in your BBQ pit or fire pan.  You just need a safe place to build a fire and create coals to place under, on and around your dutch oven.

The dutch oven can cook just about anything you can imagine.
The nature of the cast iron is very forgiving and easy to cook with.  One of the easiest and most rewarding dishes that the whole family will love is a simple peach cobbler.

Here's what you need:
A dutch oven.  When you're shopping for one make a decision on the size you need based on how many people you would likely feed at a time.  If it's just 2 people you may consider a #10 which is a little smaller pot.  Otherwise, the #12 will feed the whole family.

Aluminum foil- this makes clean up so much easier when cooking a cobbler.  Line the pan, pour your contents in and throw out the lining when it's all gone.  Now just wipe out the pot when you are done.

1 to 2 boxes of regular white or yellow cake mix.

2  to 3 cans of peaches-  You can buy them all in cobbler syrup, (the ones for cobbler cost 2 to 3 times more than just regular old canned peaches) or buy 1 cobbler kind and 1 or 2 of the plain canned peaches or whatever combination you like.  I like to have at least one can of the ones in syrup that are made for cobbler and 1-2 just plain old canned peaches.

A stick of butter

Pour in 2-3 cans of peaches and spread them evenly.  Pour the cake mix evenly throughout the pan covering the peaches.  Cut butter pads about 1/4 inch thick and spread evenly throughout the pot.  This helps create the crust.

Assuming you have a fire that has burned down to coals, spread coals out evenly, place the dutch oven on the coals and place coals on the lid of the dutch oven.  When you start to smell it, it's about ready.  Be careful if you decide to check it as it's easy to spill coals from the lid into the pot.

When it's ready, remove the oven from the coals and set away from the fire.  Let it cool for about 30 minutes.  Scoop a big heaping helping into your bowl and then reach into the homemade ice cream bin and put a big ol scoop next to the cobbler and hold on!

The 7 mm-08 A Replacement For the 7 Mag? Let's Find Out

In an earlier article I shared the story of a disaster with my Savage 116 stainless 7mm Mag.  This is not the first of it's kind with this gun.  I have questioned my abilities, my nerve and even my manhood over this gun!  I am now pretty sure I have an issue with the gun and I don't suck so badly after all as I have made the same shots with other firearms with no trouble.

I am now retiring my 7 mag and pulling a Stevens 200 in 7mm-08 off the bench and out of the safe.  It will finally get it's turn as first string, across the canyon, deer rifle.  I have a box of 139 grain spitzer bullets that start the round development off.  I'm pretty sure that I will use IMR 4064, but I will develop a load that the gun prefers.  I have found this gun does not like polymer tipped projectiles for some reason.  I have achieved promising results with soft tips, however.  

History of this gun-  I purchased this rifle from a friend at work a couple of years ago.  It was a bare bones cheap Stevens 200 with a cheap Tupperware stock and for some reason it kicked like a mule. This little 7mm-08 would absolutely punish you at the range.  I made a few mods and have improved its performance as well as its disposition on the bench. It's a pleasure to shoot now. 

The Mods- After shooting the gun as I received it it was not pleasant and really didn't shoot very well.  It had a terrible trigger and stock.  I replaced the trigger with a Timmney and put a good Hogue stock and added a bi-pod for weight and stability. The trigger is crisp and the recoil is a sweet, loving nudge as we shoot.  All this was done a couple of years ago and since then it's been a safe queen.

Popular opinion is that the "7-08" will perform well for my needs, which are currently shots at about 200 to 400 yards with very little need for 400.  I have always liked the caliber and look forward to exploring its abilities as well as my own.

I would greatly enjoy hearing your opinions and comments on this caliber and topic.  Please feel free to engage in the comments box provided below.

-Steve Smith-